Caribbean Waters Quilted Acrylic Wall Hanging
- 74 views
I had a number of firsts this year.
I decided to enter something in my guild's quilt show. I've been in the guild close to 6 years and was never interested in creating something for the show, but after stumbling across the quilted acrylic canvases, I decided I had finally found something I wanted to submit.
I took the watercolor painted applique last year and wanted to take it up several notches. I had only been dabbling with it. Meanwhile, I had been holding onto 3 canvases that I had dubbed Caribbean Waters. The two techniques suddenly collided.
I created my largest acrylic canvas piece to date. Small canvases are easy to quilt, but the larger canvases are extremely difficult to roll and fit into a domestic sized sewing machine.
It grew to be 35" x 26.5". Along the way, I decided to paint 2 additional canvases to increase the amount of color variation. The wall hanging drew upon 7 (28" x 30") canvases
Taking in drying times, research and planning, most of the work was stop and go. I estimate that I spent between 60-68 hours work on it.
The first step was to cut the squares and rectangles from the 7 canvases, then find interesting ways to lay them out. Once I was happy with that arrangement, I assembled each row together with zigzag stitches.
Before I had connected the rows together, it occurred to me late one night that I needed to create a more movement in the design. It needed more waves.
I spent several days thinking about how to execute this idea.
I came to realize that I could cut a wave into one row, then lay it on top of a second row and use it as the template to cut the matching wave.
The two would, in theory match perfectly. I was very nervous, because I didn't want to ruin the canvases, but it worked! I then set about cutting waves, matching waves and then zigzag stitching each row together.
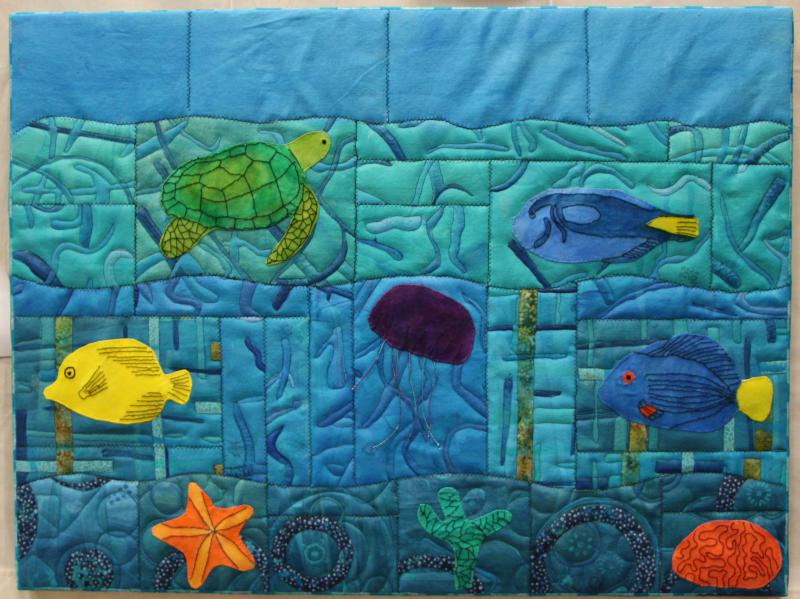
I decided to call it Tropically Submerged.
The topmost row represents the blue sky. The second row represents the shallower waters, followed by a mid-range depth. I added the green/yellow strips to the mid-range water to represent seaweed.
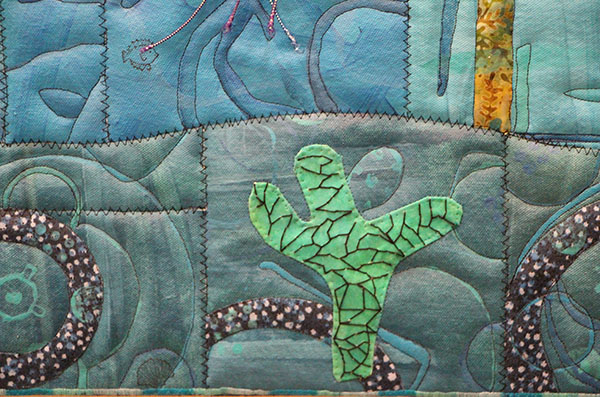
Finally the last row represents the deep blue sea. The fused blue circle fabric represents additional coral.
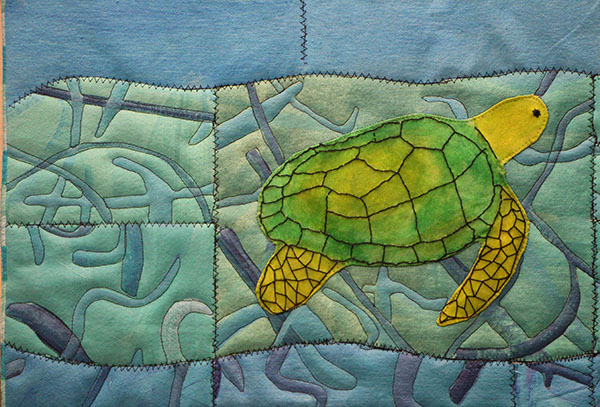
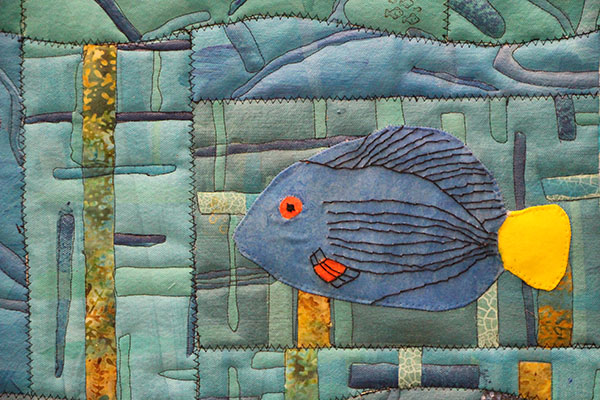
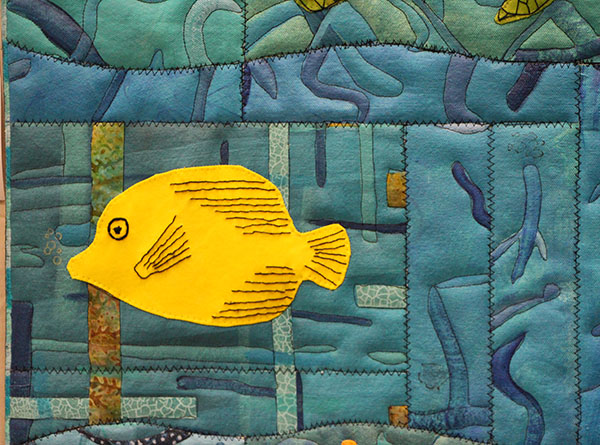
Each of the tropical fish are watercolor painted onto PFD (Prepare for Dye) white fabric. This is the state that fabric is in, before the manufactures print color and design onto it. The watercolor paint is a combination of inktense watercolor pencils, Inktense blocks and liquid fabric medium.
All of the stitching on the fish and coral is by hand. I fabric and watercolor paint are thick, so this was no easy task. I had to pre-punch the holes with the needle and a metal thimble, before making the stitches.
The had the most fun with the sea turtle. This was the first time I had blended watercolor paint across the fabric. It's difficult to pull this off, since I have so little experience with watercolor paint.
It also took several days to figure out how to embroider the turtle. We happened to be visiting Charleston, South Carolina. I stumbled across a little glass sea turtle. I came up with a way to mimic the texture from the glass sea turtle onto my sea turtle.
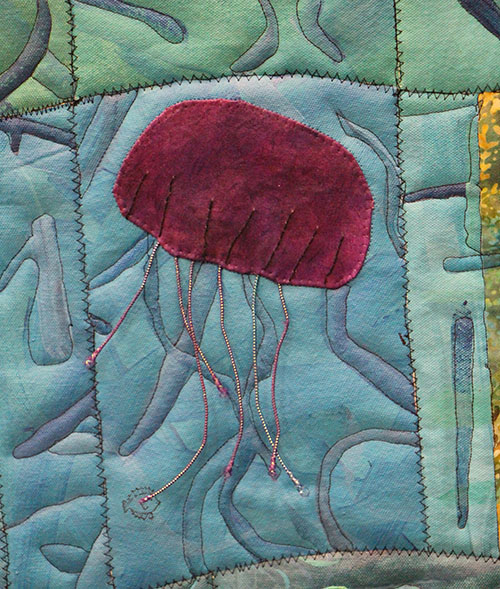
I decided late in the game that I needed a better variety of color. The jelly fish was the perfect solution and I decided to go with a deep purple. I originally wanted to stitch the tentacles down, but decided that leaving them loose would add to the three dimensional effect.
I spent several days researching tropical fish, before I selected these three styles.

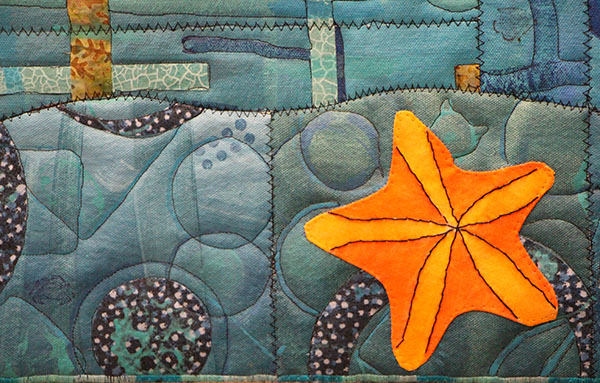
I took a few more days to decide that I needed a starfish. I wasn't able to blend the colors very well, but then realized that the embroidery would hide a multitude of mistakes.
The embroidery on the coral was the most difficult effect to achieve. I decided to just start stitching to see what would happen. I was happy with the result!
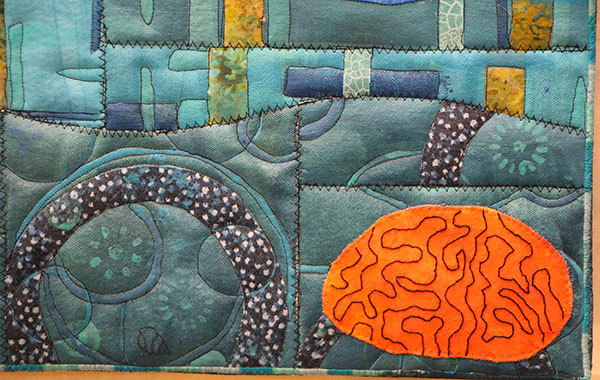
Embroidering the brain coral was also difficult. I did my best to mimic the textures I found in my research. I think the end result works pretty good.
Once everything was assembled, it needed to be quilted. As I mentioned above, this piece was pretty unwieldy on my domestic sized sewing machine. Since it was free motion quilted, I was able to roll the piece and steadily unroll and re-roll as I quilted. It took a couple of hours to quilt around all of the paint markings and fabric.
One of the most difficult aspects of quilting acrylic paint is that once you puncture the canvas with a needle, the hole is there permanently. There is zero room for error. You must live with whatever happens during the quilting process. There is no ripping out thread for a second attempt.
The final step was to build the frame with my miter saw. This was one of the first attempts and it's a little rough in places.
I have since built 14 frames and have improved this process greatly, but it was a very steep learning curve.
All in all, I'm extremely happy with my first huge project, but I'm looking forward to working on smaller projects for a while.