The Mixed Media Quilted Canvas Process
- 42 views
These quilted mixed media projects require a great deal of preparation and it can take up to a week of daily work.
I was already shopping at Dick Blick Art Supplies. They have a great selection of everything, including bulk raw 7 oz canvas (online only) at a really affordable price.
As for acrylic paint, I went with Blick. They have value, student and professional grade acrylic paints. I chose the value paint.
One of the hardest lessons I had to learn was color selection. Do I want coordinating, complimentary or contrasting colors? What 2 or 3 colors would I need to mix to achieve color X?
My first project followed the on-line class to the letter: exact colors, fabric styles, cutting options, etc. I wanted to understand how it all worked, before I took it in my own direction.
After that first project, I started thinking in terms of color combinations relating to something physical. I thought Roses would be great - 3 different colors of roses. Another idea was Caribbean waters- turquoise and blues. Rainbows would be terrific, but that would mean 6 different canvases!
Examples of the Rose inspired canvases: Red, Pink and Peach. Notice how each canvas contains colors from each background color.


Aside from selecting the paint, I had to go on a scavenger hunt through various stores like Michael's and Hobby Lobby to find a variety of objects that would be used to stamp shapes onto the canvases.
These can be anything that would form an interesting shape to set upon the canvas. These are some of my favorites.
I use cheap cookie cutters ($1 each at Michael's) and interesting foam stamps. I have a thing for pineapples and the large flower works great set inside a donut of fabric.

Cheap tin containers that were on sale at the end of the season from Hobby Lobby.

Stampers (typically on sale at Michaels), legos, Tim Holtz door knobs and wooden spools.

Having selected these objects, the next step is to prepare the canvases- a process that can take an entire week, which is a significant chunk of time - literally watching paint dry!
Each canvas needs to be roughly 28" x 30". I've gotten into the habit of preparing upwards of 12 canvases, so that I always have extras on hand, if inspiration ever strikes out of the blue.
Each canvas must be primed with a special GAC-100 mixture. It's not cheap- $70 for 128 ounces! It's applied with a large paint bush and each canvas must be completely covered and then hung to dry. This can take a day.
Afterward, it's time to apply a second coat of the mixture, then let to dry for another day. I have learned the hard way that you need to mark each canvas in the corner on one side. This is to ensure that you are coating the same side each time and then painting on that same side later. Things go really badly if you don't do this!
These treated canvases are then mounted onto foam board with masking tape. The foam boards are a few inches larger than the canvas and are around $23 for 5. I found a large package on Amazon that came out cheaper per board. They can be reused a large number of times. It just depends on how well you take care of them.
Now it's time to finally paint! Each of the colors are blended across and down each canvas. After my 9th or 10th canvas, I learned to stop panicking and just have fun with the process. There is no right or wrong way to blend. It's a go by the feel kind of process.
It's time to dry again, which can take another full day!
It's usually at this point that determine what kind of fabric I want applied to which canvas. Here are some left over examples of fabric that I have used. I used a circular rotary cutter to achieve the circles and donut shapes. I love the donuts!

I've found that the layering process is the funnest part. You get to chose which canvas you want to apply stamps and which you want fabric, or both. The fabric is applied with mat medium and must be allowed to dry afterwards for a couple of hours.
This is still not the final stage! Paint is applied across and onto the fabric. This pulls the fabric out of the foreground, so that it's integrated more into the overall design.
More paint means time to let it dry! Afterward, you can peel them off the foam boards and squared up evenly.
It's time to think about how you want to slice and dice your artwork into squares and rectangles.
Here are some leftover scraps of previous and current projects.


I found it best to lay the pieces out, then shuffle them around until you slowly become happy with the layout. I did this for 2 solid hours with my first project!
An example of an assembled project:
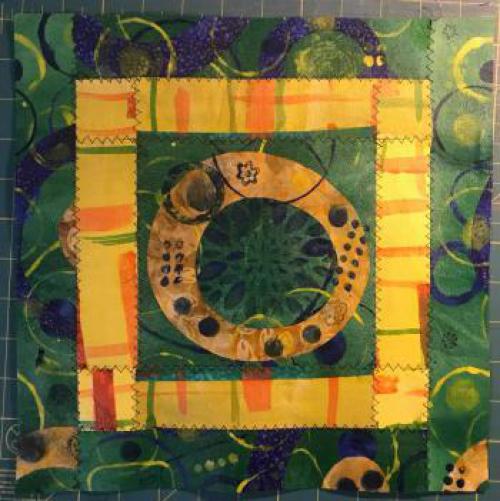
The next phase is a little unnerving, especially since my quilting skills are still developing. I quilt along all of the painted lines and keep to the ditch between each of square. The quilting adds a nice puffy, 3-D texture to the artwork.
You may be able to see the satin stitch all the way around the canvas. This locks the quilting thread into place and prevents fraying of the canvas edge.
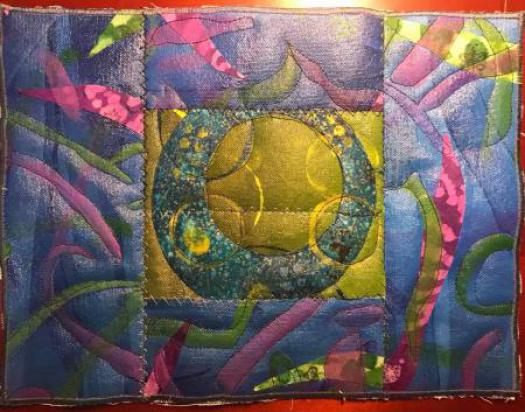
Example of a project that has been quilted
This nearly finished piece must now be mounted onto another larger piece of raw canvas and then tacked it down with a zigzag stitched. This is to prepare it for the wooden frame.
The edges are then measured and the wood for the frame is cut. The canvas is stapled along the back side of the frame and treated with mat medium to prevent it from unraveling. The outer edge can be painted to match the color scheme of the finished piece.
So, short story- this process is a lot of work and a lot of patience is needed to watch paint dry!
BUT- I've found this entire process to be relaxing and a great way to experiment as an outlet for creativity. I know that I will be making these for the rest of my life.